Using mixers as phase detectors for simple PLLs, in particular where the comparison frequency is high compared with the loop bandwidth. Peter Chadwick, G3RZP, has been associated with PLL synthesiser design for many years and disagreed with some of the points raised. He writes:
"Analogue phase detectors using mixers is very interesting. Because the mixer type phase detector is just that and not a phase and frequency detector, unless the error in VCO frequency is small, the lock up time can be very large and, indeed, effectively infinite. Manassewitsch (Frequency Synthesisers, 2nd Edition, Wiley 1980 ISBN 0-471-07917-0) covers the subject in detail. For this reason, in the heyday of analogue phase comparators in PLLs back in the 1960s, it was usual to include a sweep circuit to aid acquisition.
"Other problems worth noticing are that because the signal levels are lower, the probability of increased phase noise (probably 20dB or more) within the loop bandwidth is higher as compared with CMOS phase detectors operating at higher voltages. For this reason, it is often better to divide to lower frequencies for the phase comparison, even though the phase noise multiplication can increase. The optimum solution can, as usual, only be achieved by careful system design."This is a case where oversimplification of a concept can read less experienced readers astray.
"Some modern PLL chips and phase comparators can, indeed, work perfectly satisfactorily, now, at up to hundreds of MHz. But such devices are not commonplace or straightforward to control. For a simple PLL, such as locking a high Q, restricted tuning range VCO to a 10MHz reference input, a simple mixer comparator should function quite well enough.
Many plug-in or standalone power supplies these days use switch mode designs rather than being of the older, linear, transformer-diode-capacitor design. As a result, they tend to have considerably higher power ratings for a given size and are significantly lighter weight. Most important of all, they are regulated. Output currents of several amps are quite common, making their use for many amateur projects quite attractive. It also means that a PSU does not have to be built into the case of your new project, leading to size, weight and complexity reductions plus other possible advantages! Many modern plug-top SMPSUs are designed for operation over an input range of 100 to 240V for compatibility with mains supplies all over the world. This gives another incidental advantage, which I'll cover later. Probably the most popular sort to be found on the surplus market, or more likely at your local tip or in a skip, are those that were originally used with laptop computer and TV / cable set top boxes. Some old mobile phone chargers can also be suitable, for modification. It is almost certain that the voltage output will not be what you want, and here I'll show how one type of SMPSU can be modified to give any output voltage you want. There is no guarantee that any surplus module found will follow exactly the details given here, but many that have been looked at do... Find a well-made and well-designed SMPSU that appear at rallies over the last few years. Some come with a UK 13A adaptor and are rated at 5V output at up to 2.4A. While this voltage is useful as-is, but not quite the voltage that is required. The modification just involves changing one or two components around the voltage stabilisation feedback circuitry.
MODIFYING PLUG TOP PSUs.
      Before you start, it's important to ensure that
    anything you're working on is disconnected from the
              mains or other voltage source.
First, open the case by carefully prising apart the joint between the two halves of the case to break the few spots of glue usually used to hold it together. A flat bladed screwdriver inserted and twisted at several points around the joint is usually sufficient. More stubborn casings will require careful attention with a Stanley knife or small hacksaw. Be careful not to damage the case because its integrity is important for maintaining electrical safety.
Once inside, look to see what you have. SMPSUs follow a number of different designs in their drive or input-side circuitry, from simple free-running oscillators to custom IC designs. Fortunately we don't need to consider this part at all. Figure 1 shows the circuit diagram of the output side of the unit illustrated, which includes the rectifier, smoothing and voltage regulation, as well as overvoltage protection (not always present on lower specification PSUs). Most SMPSUs use a similar sort of circuit.
Feedback for voltage regulation is via opto-isolators to avoid any galvanic connection between the mains circuitry and the isolated DC output. The voltage reference is formed by the TL431 adjustable Zener; when the 'ADJ' terminal rises above 2.5V the device turns on and sinks current into the K terminal. (Yes, I know these terminals look as if they are labelled incorrectly, but they are shown as on the data sheet and as a Zener would be connected - it is confusing). 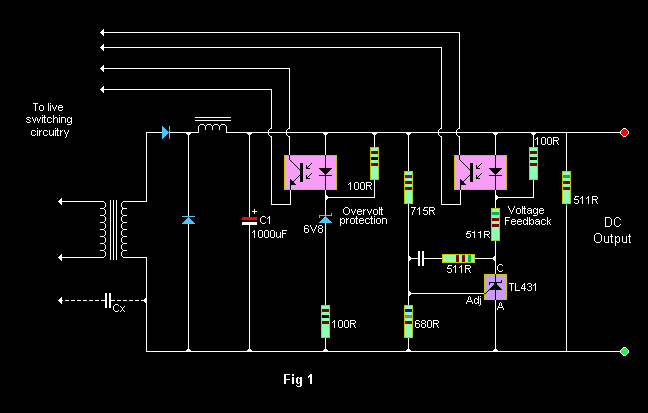 The 711 and 680ohm resistors divide the wanted output voltage of 5.1 V down to the 2.5V reference level. The TL 431 is easily the most popular voltage reference and used in just about all SMPSUs; used this way with direct drive of an opto-isolator it allows a high loop gain to remove the effects of nonlinearities in the opto-isolator transfer characteristic. The sharp switch-on as 2.5V is approached, coupled via the isolator to the SMPSU feedback pin means than the overall SMPSU loop gain often ends up excessively high, needing compensation to prevent instability. This can be seen in the additional CR network around the TL431 connections. Figure 1 also shows how a separate Zener is used with an additional opto-isolator for overvoltage protection; here its measured trip level was at about 7.9V.
The first stage of modification is to calculate the new values needed in the voltage divider. Referring to Figure 1, if the lower 680ohm resistor is kept, the new value to replace the top 711ohm one is calculated by:
Vout = (R1/680 + 1)*2.5

Rearranging:
R1 = (Vout/2.5 - 1)*680
For 6V, R1 needs to be 952ohm (1k in parallel with 20k). For 13.5V output, R1 = 3000ohm. Using best SMT soldering practices replace Rl with a new resistor (or several combined to give the correct value). For higher output voltages, additional work is needed. First, the over volt protection needs to be upgraded - replacing ZD1 with one rated at 15V gave a trip level around 18V. There is one more vital area to be considered: the voltage rating of the output smoothing capacitor C1. On the module shown this is 1000uF/lOV, and is physically quite small. Clearly this has to be replaced, and one was found in the junk box of 470uF/25V, which is quite adequate. This capacitor was older and somewhat larger, but could be shoe-horned into the available space. A more modern newer component would probably fit better. As we will be using these wide inputvoltage-range units at the upper end of their specification, it means that the input switching circuitry is running at quite a low current when delivering full power with maximum input volts. Now, assuming we have increased the output voltage of our modified unit we would normally expect to have to decrease the output current specification to maintain a constant power capability, but here that doesn't necessarily follow. The critical value is the actual output current that dictates the size of the rectifier diodes, output inductor and wire thickness. We can probably get away with drawing the same output current at the increased voltage as was possible with the original specification. Operating the switcher at 240V input means input current won't be exceeded. I can't offer a guarantee this will always be the case, modified for 13.5V delivered just over 2A continuously for several days soak-testing without any adverse effects and actually ran surprisingly cool for a PSU supplying nearly 30W. The modifications described can often be adapted for the vast majority of SMPSUs to be found on the surplus market. Examine and trace out the circuitry round the output stage; if you find a TL431 then you're home and dry! Some laptop PSUs have particularly 'meaty' ratings, and it should be possible to modify these into a quite useful 13V supply at 4 to 5A.